
How To Make Powerful Conjuring Cards Using the ATC/ACEO Format
- Silver RavenWolf

- Mar 3, 2012
- 21 min read

How To Create Conjuring Cards Using the ATC/ACEO Art Form
by Silver RavenWolf copyright 2012
I started using ATC/ACEO’s as conjuring cards about five years ago. The compact size and the ability to layer and add embellishments (even three dimensional ones) make them a marvelous vehicle for a variety of magickal applications. You can carry them as affirmations, craft them into an actual spell, use them in meditation and ritual, set lights on them (burn candles), put them in mojo bags, sachets, your wallet, or give them to friends as carriers of healing and love energy. You can place them on your desk at work, glue them in your Book of Shadows…the applications are endless…your imagination gone wild…and unless the card specifically says: I AM A SPELL — no one, absolutely no one, will realize that little card is a powerful piece of functioning magick!
The Art Trading Card (ATC), sometimes called Art Cards Editions and Originals (ACEO) has only one basic rule (the size — 2.5 x 3.5 inches, which is the size of a trading card). That’s it. The creator is fee to express any theme they desire in a wide array of mediums from digital art to physical cut and paste. The ATC is usually not sold, but traded, and is normally one-of-a-kind. The ACEO can be unique or can be a numbered copy (for example if the card is a photograph or a digital collage) and sold either in private or on the public market. Just like a sports trading card, your ACEO/ATC card can be placed in a protective plastic sleeve or box. Slim sleeves work well for cards without embellishments. Plastic boxes with hinges designed for ten or more sports cards work well for your conjuring cards with three dimensional ephemera attached. I’ve used the box idea for years as an easy, on-the-go spell that fits in my purse.
Many times folks have said to me that they have no talent, and so they don’t attempt to indulge themselves in creative pursuits. Perhaps, as a child, someone made fun of a craft or drawing, or they were humiliated in some way in connection with artistic endeavors. The good news here is that ANY ATC/ACEO, as long as the size rule is followed, can look like absolutely anything! There are no nasty mouthed judges waiting in the wings to masticate on your masterpiece. With the ACEO anything goes!
The techniques I will show you today center on healing energy. In past posts we’ve worked on success, protection and good fortune. A healing Conjuring Card is a wonderful gift to give to anyone. It can spell out what it is for in the end design, or you can simply use imagery or color to promote your theme.
Healing 101
Before we begin making our healing conjuring cards let’s stop just a sec, take a deep breath, relax, and talk about healing energy. To me, there are two types of healing:
(1) Banishing and Cleansing (2) Recovery and Transformation
The first is to get rid of the bad; the second is to bring in the good– that simple. In any healing, you may wish to start with the banishing/cleansing energy working first, and then once you are sure that is occurring, work on the recovery and transformation process. Any time anyone asks me about a problem, whether it is healing or a bad love relationship, the first three questions I always ask are: Have you done a spiritual cleansing? Have you cleansed your environment? If so, how many times?
How do you know your healing work is…well…working? In Braucherei as well as other magickal systems (although timing among the systems themselves and the practioner’s experience plays a role), the rule of magickal thumb is — always in three’s. However, the three’s do differ.
The first “3” — there is a signal. The second “3” — there is noticeable shift toward change. The third “3” — the desired change is occurring full force or has concluded.
What type of “3” (three minutes, three hours, three days, three weeks, three months) depends upon:
(1) The type of working. (2) The practitioner. (3) The individual who desires the healing. (4) The type of problem (I was taught that for many maladies, since you didn’t get sick in a day you most likely won’t get well in a day — meaning the time it took to get sick indicates the time it takes to get well. The initial stresser is the timing key.) Short problems, short time — Chronic problems, longer time.
For example, when a Braucher works to stop blood, lessen a fever, or heal a first or second degree burn a signal that the tide has turned occurs in 3 minutes. With stopping blood or reducing a fever overall success (many times) is achieved within that 3 minute span. With the burn, within 3 minutes the burning feeling should stop — that is your signal that your first round of chants and energy work has been successful. In these cases, the signal is apparent — the blood stops flowing from the wound, the fever drops, the burn stops feeling like it is on fire. Not all maladies, however, are obedient to three minutes (as we well know). In other instances the signal is not as evident and may take up to three days to manifest, shift and forward movement may take up to three weeks, and healing may take up to three months.
In healing, you always work again if there is no signal based on the problem at hand (you certainly couldn’t wait three days for someone to stop bleeding) — so common sense here plays a role in what time frame you should expect that signal. You always work again if there is no shift. You never wait for that three month indicator without the signal or the shift when you are considering chronic problems.
And, as a note, some Braucherei practitioners carry Conjure Cards in their wallet or purse with the healing chants for stopping blood and healing burns printed on them. This is because:
(1) The card was made in a calm, spiritual environment. (2) They may be so upset that they forget the chant. (No kidding, it can happen.) or, (3) They are an EMT or nurse who can’t be chattering while doing their job. They simply touch the card in the pocket while they work.
It is also always good to have a general chant memorized whether it is a Braucherei one, a Pagan poem (I love Doreen Valiente‘s Darksome Night and Shining Moon) or the 23rd Psalm — something you can say by rote in a sing-song or whisper voice without having to “think” about the words. A song, chant or charm that has great meaning for you.
My last thought on healing energy is that this energy isn’t just for healing the body, mind, or soul — what about the energy in your environment? Let’s say your girl friend or wife just walked out and left you for good, screaming and pounding the walls in a tremendous exit? Just as you are sick inside due to this negative energy, this very same energy infected the walls, the carpet, and all your stuff. Or, how about your money? Debt or debilitated income can be viewed as a disease of your finances.
Okay! With those brief thoughts on healing in mind, let’s move on.
Where To Begin
The Conjuring Card starts with a desire — yours, which is the theme. Paper choice is entirely up to you. I like heavy cardstock or matte board because I want the card to last. Since I love to layer my designs, I usually use matte board; but, you can choose to begin your card with a brown paper bag. Don’t feel you need to rush out and purchase special paper. Start with what you have. If you’d like a thicker card, use the cardboard from the back of a writing tablet or old notebook. You may even wish to design your card on your computer using Adobe Illustrator or PhotoShop, or one of the other drawing software products currently on the market. That’s okay, too. If, once you make your first card, you think this is something you’d like to continue, you can purchase precut cards specifically made for ATC/ACEO’s. From watercolor paper to bristol board, there are several types from which to choose.

In most of the designs in this article I used papers and elements you can purchase at most any craft store, find in the home, or even in your tool box. I tried to stick to these items because, many times, people feel that if they can’t find the exact same thing shown in an article, they can’t complete the project. Not here. Your own creativity is the most important supply of all!
The Magick IN the Conjuring Card
With the artistic conjuring card, I look at each card like it is an empty mojo bag ready to fill, capable of producing any desire you wish. Like the mojo (or conjuring bag) I begin with three basic magickal elements. For example, with the cards in this article I use a chant or charm written on the card (1), runes, planetary symbols or other sigils (2), powdered herbs hidden underneath the first layer of the card (3), completed with any number of embellishments that may (or may not) have magickal significance. In place of the herbs, I sometimes use a variety of activation sprays from perfume to holy water. I’ll show you how to incorporate these items shortly.
Color is also an important, magickal element and can be used in a traditional format like you read about in all the magick books, or can be tailored to the likes of a particular individual. Let’s say you were going to give Aunt Jane a spiritual healing card because she just lost Uncle John to an illness. You might choose lavender or purple, maybe a little light blue or lots of white trying to tune in on the higher vibrations of those colors; however, Aunt Jane has always had a penchant for red poppies, her most-favorite-ever flower! And, you know that Aunt Jane just loves, truly adores anything with red poppies — dishes, scarves, dresses…yada. Absolutely her card should have red poppies on it! The love of the image is definitely part of the magick!
The fundamental theme in Art Magick is this: Learn the basic rules of your system or faith (of Wicca, of Braucherei, of Druidism, of Hoodoo, of Santeria, etc.) and follow them until you KNOW them; THEN use your instinct.
Which brings us to design. You can use traditional shapes or pictures that are somehow associated with healing, or you can go with what already “heals” such as Aunt Jane’s poppies. Most ATC/ACEO cards have some type of focal image, whether it depicts a vintage photograph or a rubber stamp image of an animal or flower — something that sets the tone of the piece. Many times the main interest item is a word, such as “love”, “joy”, “beauty”, “passion” — all these words are healing ideas that speak of some kind of positive healthy state, or healing by the energy the word carries. Other than writing or poetry where words are the natural structure of expression, the ATC/ACEO card is one of the few art forms that welcomes the use of words.
A side note on human images for conjuring cards — choose images that match your theme. I collect vintage photographs. Because these were real people who lived happy or sad, busy or boring lives their images may not serve your healing ideas well. For example, you wouldn’t want to use a crazy-eyed old lady (normally) for healing work. However, you might find an image among vintage photos that speaks of sweetness, happiness, and serenity, or the image is simply arresting in a positive way. I never use my original photos. I always scan the image and use a photo printer to reinvent the picture, that way I’m not destroying history nor am I carrying any negativity from the original photo into my work. Be careful of using photo images pulled off the internet, a high number of these are copyright protected, and some companies that house large collections can be very aggressive over copyright infringement. Here is an example of a photo I recently bought from an Etsy artist in Portugal. I fell in love with the photo the moment I saw it, knowing I could easily repair the damage. You can find their Etsy shop at: http://www.Artstock.etsy.com


What if you can’t find the right image for your card? Use your camera! With the above copyright infringement laws in mind, taking your own picture of your favorite cauldron rather than searching the net to download one that you might not be allowed to use, doesn’t take that much time. With today’s marvelous software programs such as PhotoShop 10, you can take a picture of that cauldron, remove the background in a few clicks, and apply a filter that makes the cauldron look like it was hand drawn. You can size that image to fit your card and ta-da! You have an original image that belongs only to you. Remember those pictures for the 2011 Release Program? Many of the objects in those designs were from original photos I took each day trying to match objects to the theme of the day, as in the example below:

Too, taking pictures for conjuring card images (in my mind) strengthens the magick because you know why you took the picture, when, and where. For example, let’s say you want a cauldron of healing, and you know that dawn is a very magickal time. You might take your picture at dawn or as close to sunrise as possible to capture the magick of the moment.
How To Find the Magick
If you are unsure of just what magick you want to employ into the card, sit back, relax, and think quietly about the situation or the ultimate recipient of the card. Let your thoughts flow. Think of happy memories, personal passions…let your mind wander. What color do you “feel” like when you think of healing for that person, pet, or incident? You may wish to make the card for yourself to recover from something very negative in your life, or you may like to make a general healing card for your favorite pet, and place it on the wall near his or her food dish, on the outside of the kennel , cage or aquarium, or even sewn into the animal’s bed.
Let’s Start Making Our First Healing Conjuring Card — Time to Gather Your Supplies
From the meditation stage, begin collecting items for your card — colorful paper, lace, brads, eyelets, a focal image, herbs you might wish to powder, the right words…remember, anything is acceptable! On more than one occasion I’ve gone shopping for just the right embellishments to go with a particular card. I’ve also done a treasure hunt in my house, looking for items I might want to use on the card. Don’t forget that almost anything goes — from gears and bolts to bits of cloth and wood. Remember, the design of your card can be extremely simple or very ornate. Let your instinct guide you.

You can use almost anything as an embellishment! The bone knife is used to smooth papers when gluing and for making nice fold creases for envelopes and other projects. The purple object with the brush makes adding light, feathery areas of ink. The hammer is for brads and eyelets.
For most conjuring cards, the absolute necessities include:
Scissors (nice sharp ones that can make good cuts) X-Acto Knife (is a real plus) Ruler (to keep your edges straight) Paper — the base of the card as well as any other papers and designs Glue — I use Scotch Quick-Dry Adhesive, an Xyron machine (sticker machine) for paper, and E6000 for heavy embellishments.
For making the cards the way they were composed here, you will also need these basic magickal supplies:
White Candle Holy Water/Florida Water Enchanted Herbs of your choice that match the card (Herb Conjure Formula) – powdered. Your Favorite Incense (I used Frankincense and Myrrh for some cards and Nag Champa for others) Mortar and Pestle to grind your herbs
I also work on a white, ceramic, circular plate (representing the magick circle). What surface you choose to work on is entirely up to you. I’ve added pictures of other supplies I have used in the past, just to get your creative ideas moving if you feel you’re a little stalled.
Cleansing and Preparing Your Card(s)
You can use any cleansing, blessing, empowering process you desire for your cards. It is your sincerity and belief that are most important. In this example, I used a white plate as my working altar. I cleansed and consecrated it by washing it with holy water and Florida Water, dried the plate, and then crushed rosemary and salt into the plate (which I removed before I began working on the cards).

I then placed the blank card in the center of the magick plate. I blessed the cards with the four elements (earth, air, water, fire) and asked for the blessings of the Lord and Lady. I sprayed the back of the card with holy water. I also called for angelic energy because angels are fairly universal. The tea candle you see in the picture is actually one I poured, a batch I dedicated to the angels. You call on who and whatever you believe in. In Divine Healing there is no pecking order in religions.

If you are unsure of what to say, you can begin with:
“There is One Power, which is the God and the Goddess (or whatever you believe in), which is perfect in truth, clarity, order and mutual good. I hereby call the energies of — (name whatever you want, here we would say —healing–or you could say –the healing power of the angels (and list them)– into this work. May the positive powers of the universe unite to bring forth the healing needed for (and say the individual’s name that the work is for)”. Then, take it from there in your own words.

Once you are finished with the opening energy work, you may wish to use the blank card as your base to write your conjuration, spell, invocation, charm, sigils, magickal alphabets, etc. directly on the card. As in most cases this first layer will be covered by other layers, no one will see the magick you have conjured there. (See pictures below). If the card is for you, be sure to write your name on the card at this stage. Likewise, if the card is for someone special like your mother or best friend, their name should be on the card at this beginning stage. If you are going to give away the card, specific names aren’t necessary, although you could write “for the bearer of this card” if you so desire.
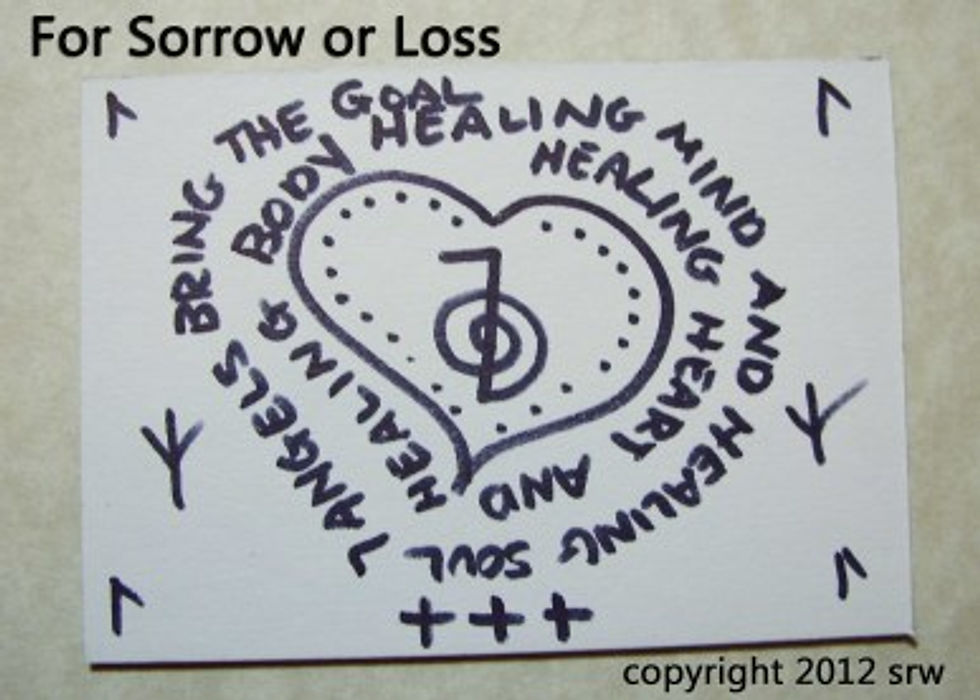
To Heal the Heart

Working On Your Conjuring Cards
The next step is to choose a background for your card.

You can use just about anything, as long as you cover the conjuration you wrote on the card with something. In the picture below, I used torn bits of paper. Before applying the background, completely powder the herb conjuration formula you have chosen for the card. Empower the herbs with your own heartfelt prayer. Then, sprinkle a bit of the herb formula in the center of the card as shown in the picture below.

The card on the left holds powdered rosemary, sage, and lemongrass. The card on the right has ritually ground eggshell and powdered frankincense resin.

Keep the formula in the center of the card so that when you glue on your background paper, the powder won’t interfere with the edges. Yes, your card may buckle a bit; but, if you are patient and allow this background layer to dry before continuing, most of the puckering will go away. If you want limited waves on the paper, press the card under heavy books overnight. After you have applied your background paper, hold the card in both hands over your heart chakra. Speak words of power, breathing deeply, and envisioning healing light entering the card. Take your time. Connect with Spirit. This procedure is called “setting the light” — and you can do it on anything, not just a healing conjuring card. When you are finished, seal the card with three equal-armed crosses drawn in the air. Below are examples of glue I use:

I use E6000 glue (not pictured in this photo, but shown in a previous photo) for heavier embellishments such as keys, coins, or clay objects. The glue shown here -- the Xron Machine permanent and Scotch photographic glue are great for paper.


Inks can be used, too, to create soft, beautiful backgrounds or embellishments.
From this point onward, your instinct and imagination will be your guide. Sometimes conjure cards will flow quickly and you’ll be finished in minutes, like the banishing illness card shown below.

I chose this paper because I liked the idea of the flow of the ocean and it fits the charm I used underneath.
Other cards may take a great deal of time while you add and remove elements until you are happy with the desired outcome. The card below took me a while evening because I couldn’t quite decide its artistic direction. Notice it is the one with the retouched photo.

There will be times when a card will require real work and thought. You may struggle finding the right elements, or you may not like how the card is coming together. That’s okay. Feeling this resistance tells you that there is some resistance to the working itself (or maybe you are just having an off day — that happens, too). If you think there is negativity or magickal resistance — don’t be afraid to cleanse and consecrate again, or ruminate more on your intended theme. Whatever “feels” off — that’s what you listen to. If you are really having trouble with a card, hold your hands over the project, close your eyes and visualize the sigil for the planet Mercury, and ask that the happy spirits or angels bring the information and items you need to successfully complete the card. Take a deep breath, open your eyes and walk away. Very shortly you will think of or find exactly what you need for the project.
Keep the atmosphere while you are working as magickal as possible. Play music or listen to meditation tapes (my favorite) that are in sync with your goal. Burn a specific color of candle that matches your desire. Use wax melts or an oil burner to infiltrate the working area with positive vibrations. Beautiful music helped to finish this card — the Healing Heart charm I showed you earlier:

This card uses a simple full background with cut shapes on top sprayed with Pearl Ink spray. I added found items, such as the button (which I cut myself), the hinge, and the heart embellishment.
Some cards will vibrate in your hands from the moment you begin working on them, or at some point near the completion, the card’s energy will spike. When this occurs you know you are on the right magickal track! The Braucherei All-Purpose card shown below is one such card. While working on your cards expect your hands to get hot — this is your creative energy flowing into the piece.

To make the Braucherei card, I began with the general "And these signs" charm, then covered it with a plain paper bag piece. I added the burlap, then darkened the edges of the card with acrylic paint. I could also have used dark inks instead of the acrylics. This gives the card a very interesting texture.

I pasted the 23rd Psalm to the Goddess on top of the brown paper bag piece, then smudged the parchment paper with a variety of inks. This creates an amazingly powerful conjuring card, the two charms vibrating together for any type of magick needed by the owner.
If you are going to work on a particular card for several days (it happens, you may begin a card and be called away) you might like to place the card in a black bag or box, to keep negative energy from permeating the work. Since you haven’t sealed the card because you’re not done, I think this helps to keep the project clear of any accidental emotional unhappiness. For example, let’s say you are working on a healing card for your friend, and your sixteen year old daughter bursts into the room screaming about something — anything — teen angst and all that. Her junk is heading right for your project. In the safe box it goes until you can get back to it.

I created this box to hold magickal objects. It can also be used as a backdrop for your altar, or used as an altar itself.

While working, take your time with the card. Move around the element images you’ve chosen, discard those that just don’t seem to quite fit (although you might simply adore the element, maybe it doesn’t belong to this card). If the card seems to be getting muddled and you suddenly don’t like it — that’s okay. Set the card aside and go do something else. Sometimes the ugliest cards turn out to be mini masterpieces with the addition of a bit of glitter, a new element you didn’t think of before, or simply distressing an element or word. Distressed elements are bits of ephemera purposefully made to look old by the use of sandpaper (you can sand the edges of paper), distressing inks, or wetting/sponging/spraying the item with dark tea (tea staining). Walnut Ink can also be used.

To distress paper you can use inks, shoe polish, acrylics, tea, coffee or Walnut Ink.

Just what is ephemera, anyway? Bits of anything! (practically). Buttons, brads, eyelets, keys, charms, bits of wood, ribbon, beads, coins, clips, lace, pmc clay, metal shapes, old pieces of jewelry, burlap, cloth — just about anything goes! Can embellishments go over the edges of the card? Yes. However, if you plan to put your embellishments in a plastic sleeve or box, remember that anything larger than the 2.5 x 3.5 inch size won’t fit in those sleeves or boxes. Most artists stick to the standard size, only fudging now and then on specific projects. The Pet Healing card below won’t fit in a standard plastic sleeve or single card box.

If your fingers are fumbling with small embellishments, try using tweezers, as shown below:

Tweezers can help to hold small embellishments while you decorate or place them after glue has been applied.
Digital Cards
You can make beautiful collages using your computer and drawing software. I use PhotoShop 10 (mentioned earlier) for most of my work. I love working digitally because I can take more time, remove and apply layers, add filters, and really get into the theme of the piece. Digital collages are also more cost effective, and can be reproduced if you really adore a design you’ve created, or if your friend says, “Hey! You know that money conjuring card you gave me? I got a check for five grand!”
Yeah, I’d want to make one or two more copies of that baby if I were you!
Once I complete the art, I size it and print it out either on photo paper or on cardstock or heavy parchment. From there I cleanse and consecrate the work, and bless it, then write any charms, spells or conjurations on a piece of 2.5 x 3.5 inch matte board. From there, I place my herbs in the center (as shown previously) and glue the finished art work right on the matte board. After sealing the work both magickally and physically, I add any three dimensional embellishments such as brads, eyelets, or other ephemera. The two examples below have water marks on them (which aren’t on the original cards) to protect the work since this article is free to all on the internet. Both cards have the added embellishment of brads.

Images of Hecate! This card contains many elements associated with the Goddess Hecate -- dogs, snakes, fences, graveyards, the toad, and even the flower she is wearing. There is a watermark on this card to protect the integrity of the image. If you plan to display your cards on the net, you may wish to include your own watermark. The recipient of this card won't see the watermark on the physical piece.

Finishing Your Cards
Most individuals who make ATC/ACEO cards sign the back of the card along with the date of completion. Some magickal practitioners actually use the date they began the card (astrological timing) as that date is often considered more important in projects than the finished date. There are supply companies that even make special rubber stamps of a little fill-in form (if you really get into it) that allows space for your name, the date, and the title of the card, or you can design your own back plate. Some artists seal the back of the card with brown paper or colored paper so that brads, eyelets, etc. don’t show through. This looks very professional and if you are giving the card as a gift, you might consider making sure the back of the card is nice and neat. Finally, most artists name their work. In the naming, the birthing process of the work is almost complete. This name is also written somewhere on the back of the card.

Sealing Your Cards — Physically and Magickally
Physical Sealers: Where some ATC artists do not seal their cards, particularly if the cards contain many three dimensional elements, others choose a variety of artist sealing products to protect the card from dust, aging, and stains. The only problem with many of these sealers is that they may smear your work, particularly if you used water based inks or decorative papers that may bleed. This can occur with both the spray on and brush on sealers. After several years of trial and error, I often use a Krylon spray for my cards; but, that too, can smear and run if you aren’t careful. My advice is always test your sealer on the same type of paper or dried ink/paint before you put the sealer on your treasured card.

Hint: When applying any finishing sealer by brush, tilt card toward the light so that you can see your brush strokes. Quickly apply limited amount of sealer and always finish with very light, feathery brush strokes to remove uneven coverage. This will also help to avoid blobs or eventual yellowing from applying too much sealer.
Sealers are sometimes used in stages. For example sealing the background before continuing to add three dimensional elements. You can also use the sealer as an art form in itself to create interesting textures, such as the Liquitex Super Heavy Gel. I used this technique on the Braucherei conjuring card:

Magickally Sealing Your Card: The card is finished! Now what? If you feel no further conjuration is required, you can simply pray over the card, reiterating your desire, then draw three equal-armed crosses in the air over the piece. If you would like to add some extra punch to the card, design a short ritual that speaks to you of completion, then seal the work by dabbing the back with holy water and finishing with the equal-armed cross motion. A Braucherei technique is to place the card in a water tight plastic bag and bury it in the ground (or a special flower pot) for three days, bringing the card out into the light at dawn on the fourth day with a short birthing incantation. The card is specifically directed to its service, then sealed with the equal-armed cross motion (3 times). Another way of sealing the card is to use a special stone that fits in the palm of the hand. Although it has other names, I think the best name we could call it is the “I KNOW” stone. When you set the stone on the card, you would say something like, “I know Aunt Jane will receive healing energy the moment I give her this card, and that this energy will continue to surround her, bringing her serenity, love and joy. I know this to be true. I know this to be so. So be it!” The stone stays on the card (or object) for at least twenty-four hours — its weight and placement settling the energy “in” the card.

Finally, you can create a birthing ritual of your own, using two white tea candles, one on either side of the card. Draw a circle around the card and candles in the air and “birth” the card from the circle as you say your favorite chants or charms.
Your card is now ready to make its way into the world! To protect your card, you can sew your own pouch, or you can use the plastic sports card sleeves and boxes I discussed earlier. If you don’t want to put your card in a plastic sleeve or box, you may like to custom make an envelope that matches your card.
Summary
In this article we worked together to make your own magickal conjuring cards for healing. You can create cards for any desire: Courage, Meditation, Love, Good Fortune, Happiness, Family Well-Being, Creativity, Escape from Addiction and so forth. My only reminder is that a conjuring card can never take the place of qualified expertise for the nature of any problem (attorney, physician, therapist, etc.), and should be used as a supplement to such care. That said, I’m excited to see the cards you create! Please write about them and feel free to post pics on my author page. We would all very much love to hear not only your experiences when creating; but, also further on, as the cards conjure exactly what you desire!

If you would like to read a little history about ATC/ACEO cards, you might like to visit http://www.art-cards.org
These cards will be available in my Etsy Store at http://www.crowcrossroads.etsy.com
In service
Silver


Comments